Moving files on your computer is a foundational function of utilizing your computer. Being able to move files from one location to another is how you can keep everything on your computer organized so that it will be easy to find the files you want amd access them when you need to.
We will go through the 3 easy steps for moving a file to a new location:
- Opening the folder where your files are currently saved
- Identifying where on your computer you would like to move the files
- Moving the files
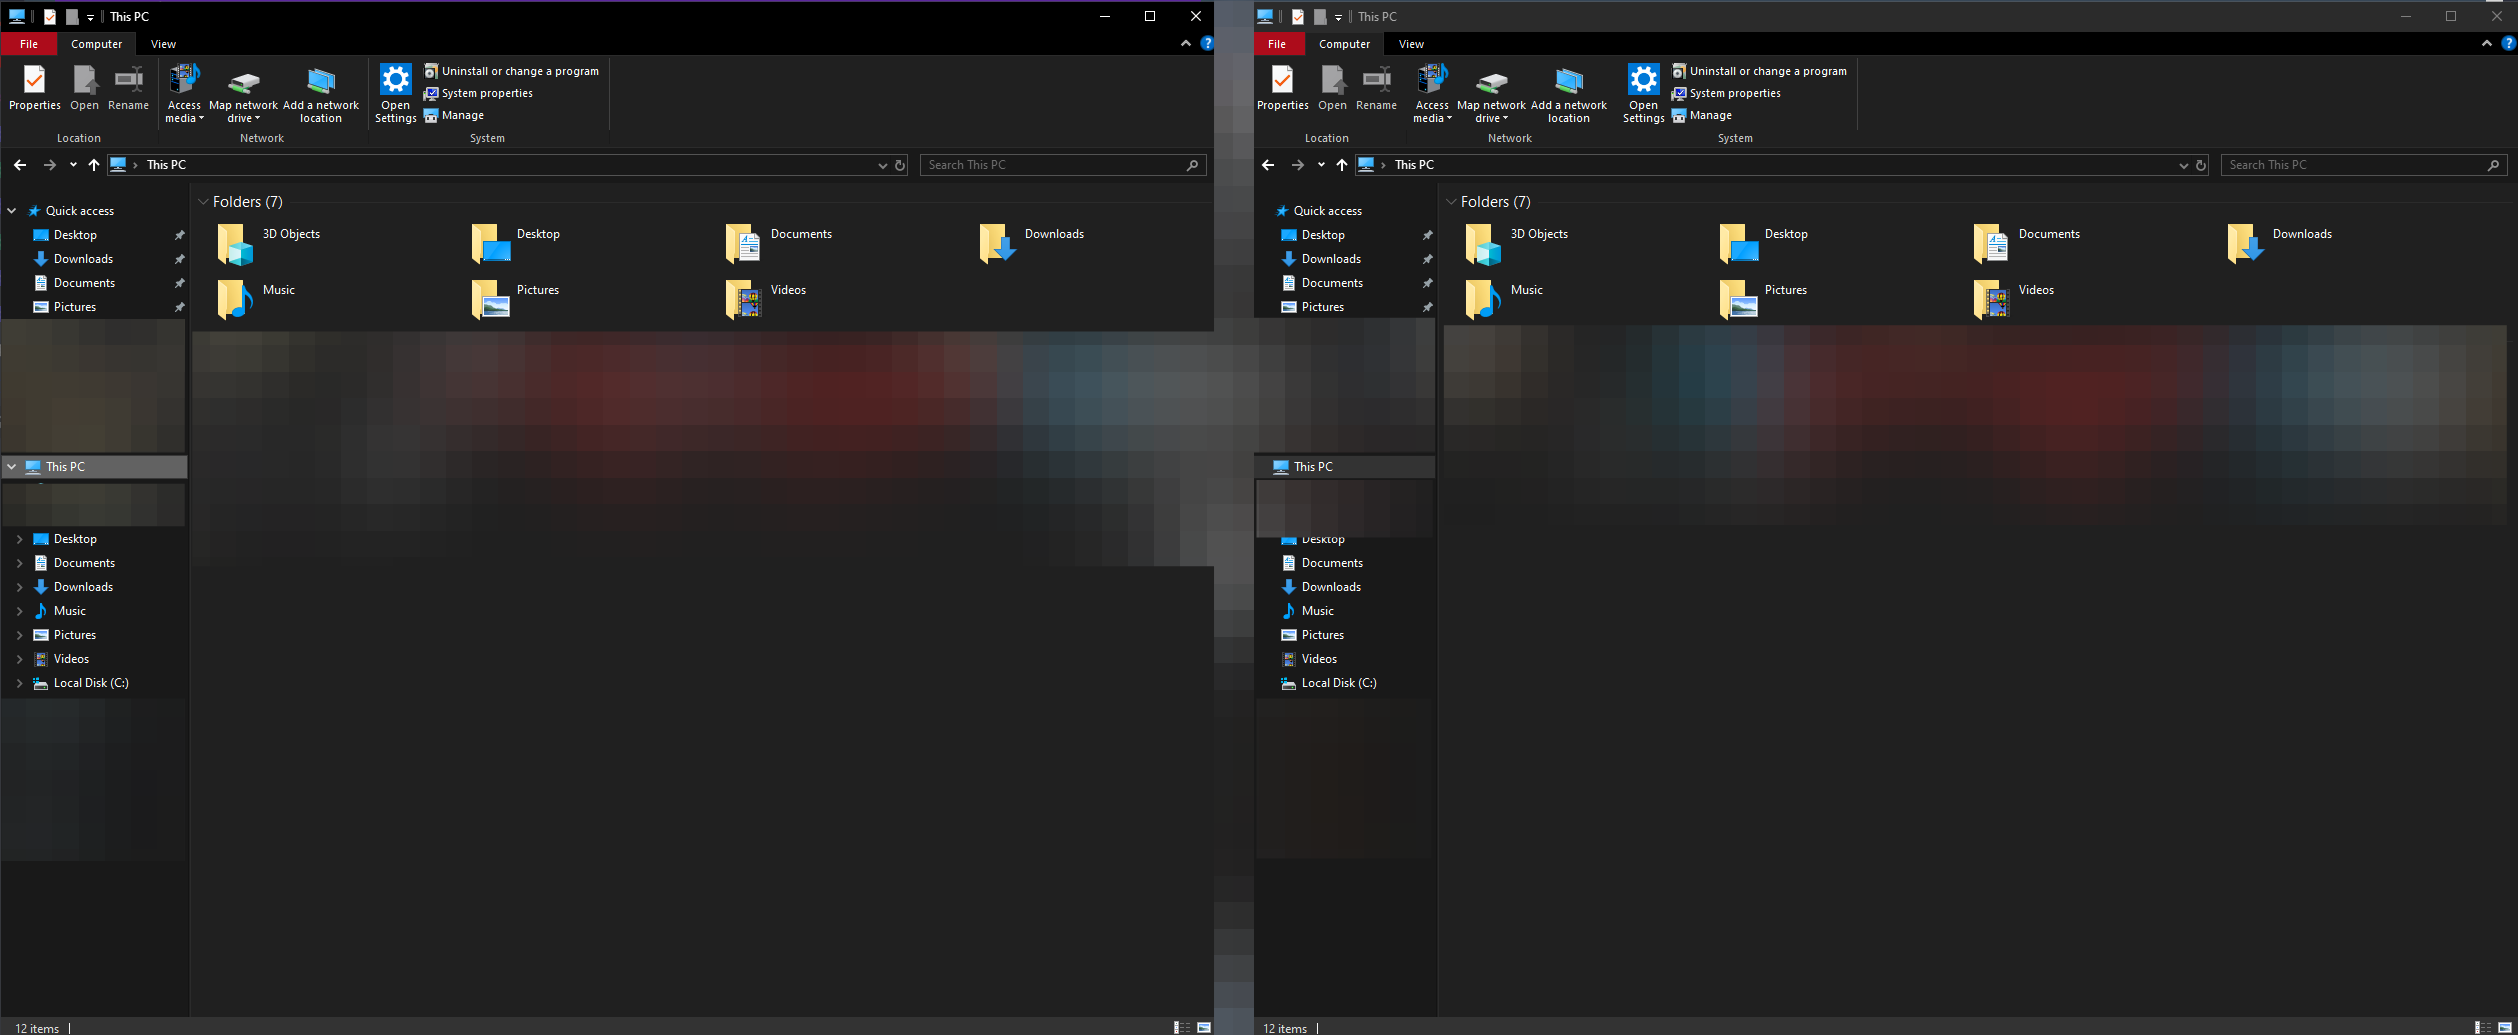
To begin we will open up two File Explorer windows and place them side by side. This will help us visualize the current folder and the new folder so we can see how files have moved from one location to the next. As you get more advanced you may not need this extra visualization, but it is helpful to start this way.
Start by opening the File Explorer. This is found in the main task bar across the bottom of your computer. Or you can search for the file explorer and open it that way.
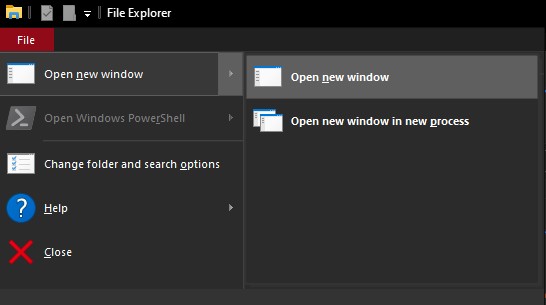
Once you have opened one file explorer window. There are a few ways to open a second. The first is to right click on the file explorer icon, and then click on “File Explorer”. This will open a second window on top of the first one. The other option is to open a second window using the first by clicking “File” in the top left of this window, and then “Open new window”.
Shortcut Command: By pressing the Ctrl + N buttons on your keyboard at the same time it will open a new window
1. Open the original location
With both File Explorers up on your computer side by side. We are going to start by finding the files we want to move.
In the left hand explorer window, browse your computer using the sidebar menu. Common locations for files are the “Documents” “Music” or “Pictures” folder. But your files may be in a custom folder you already created. Wherever those documents are stored, you want to pull them up in the left hand side window.
2. Identify new location
Now that you have located your original images that you want to move in the left hand side window we will set up the right hand side to receive those files.
If you already know where you want to move those files, your destination, then browse to that location in the right hand explorer window. If you do not yet have a destination, then you will need to create one. Think about how you would like to organize the files you are moving. Then create the necessary folders to create a destination for your files.
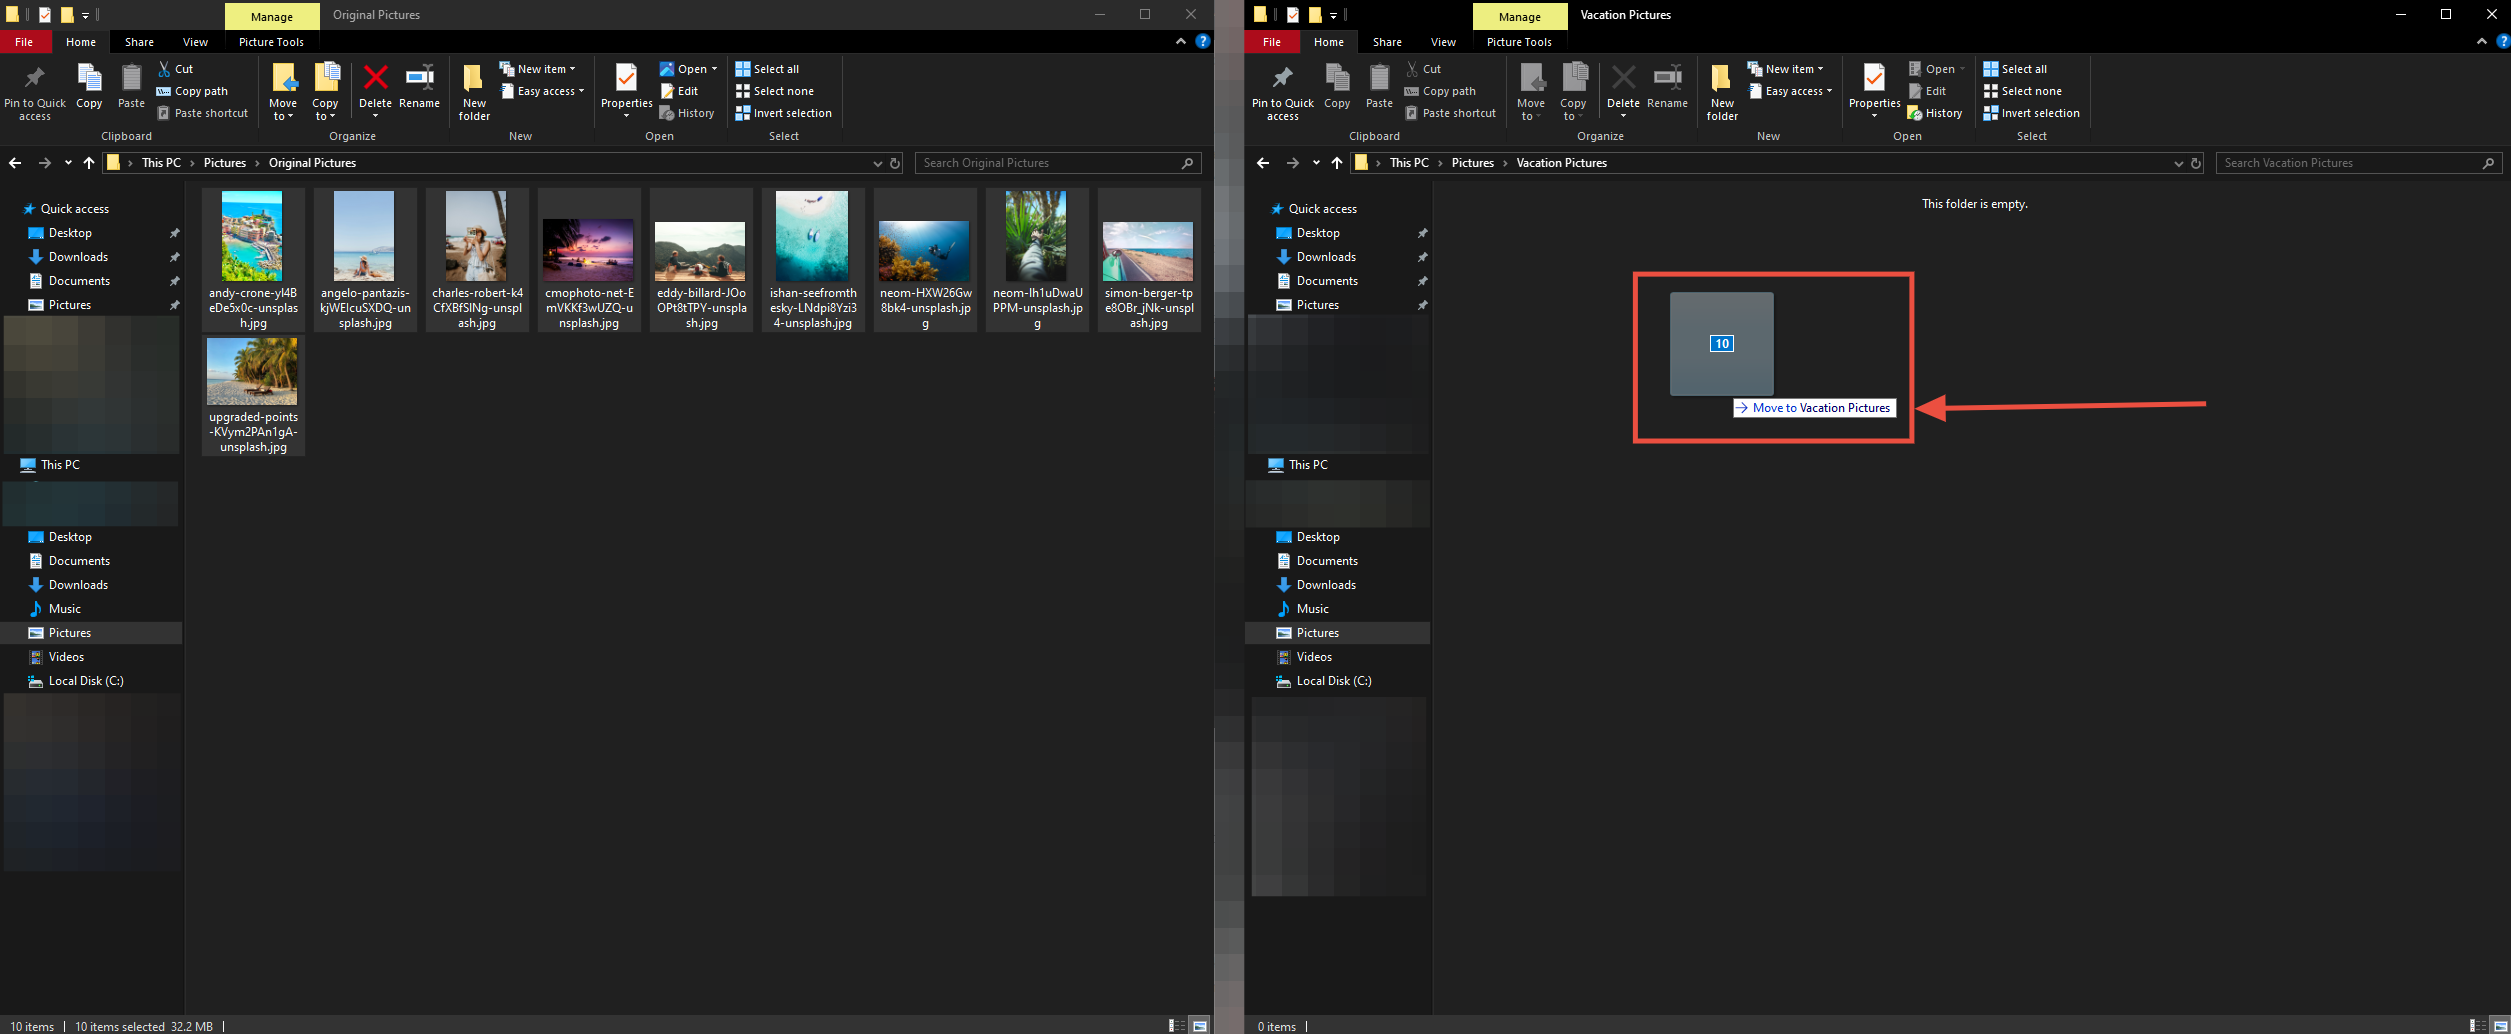
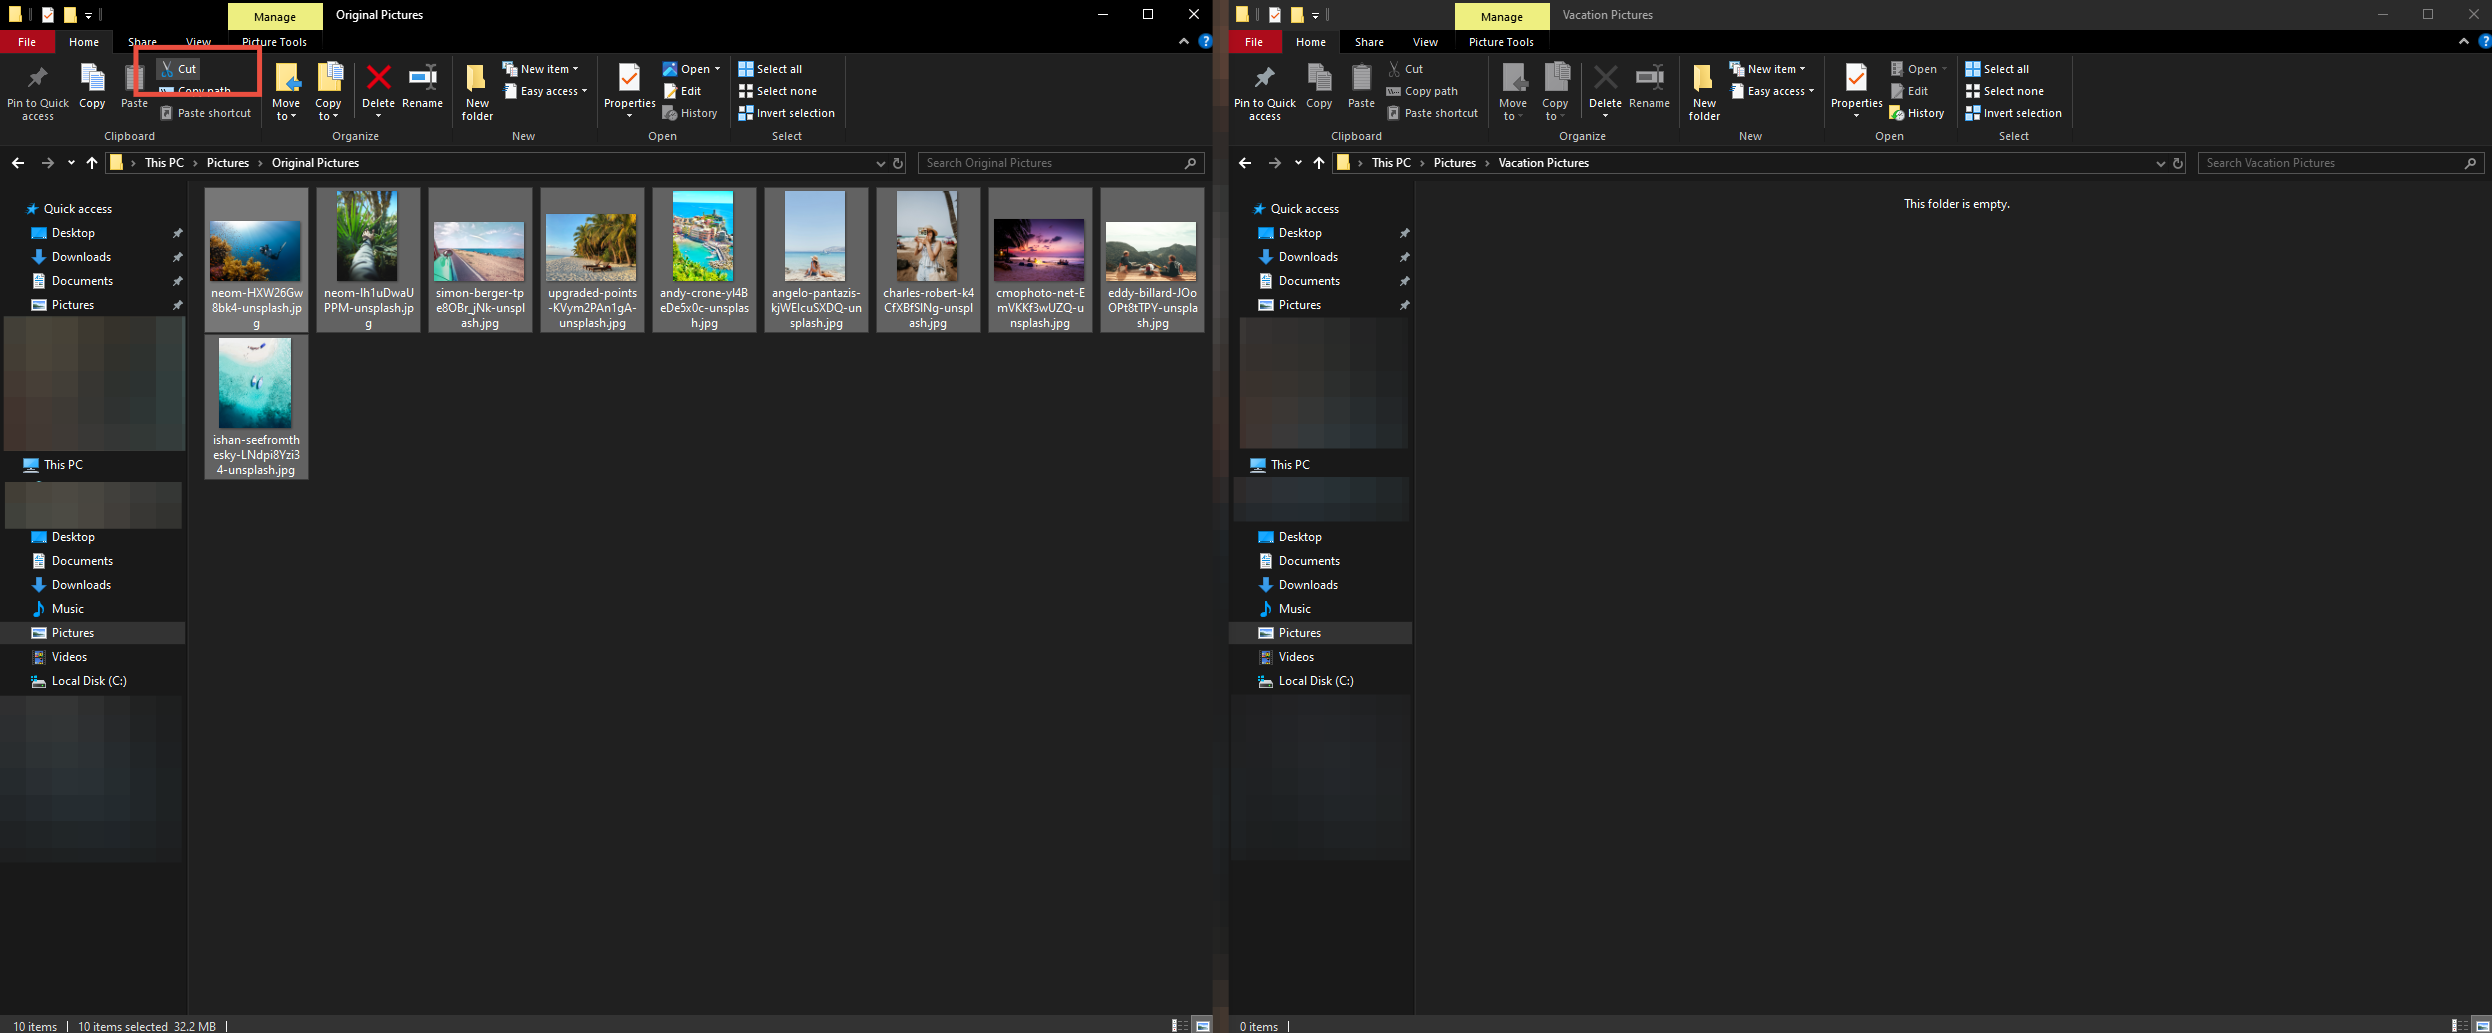
In the example here I have a folder called “Original Pictures”. This folder is within the “Pictures” folder on my computer. I want to move those pictures to a new folder called “Vacation Pictures”. In the picture below you can see that I have opened the “Original Pictures” folder on the left and the “Vacation Pictures” folder on the right.
The red boxes are there to indicate how you can identify where you are within your computers folder structure. These are good places to glance and be sure you are moving files to the correct place on your computer.
3. Moving the files
Finally we are ready to move the files. There are a few options we will cover on how you can move the files. The most common is the “drag and drop” but there is also the “cut and paste” function as well. We’ll cover both methods, but before that both methods require one initial step.
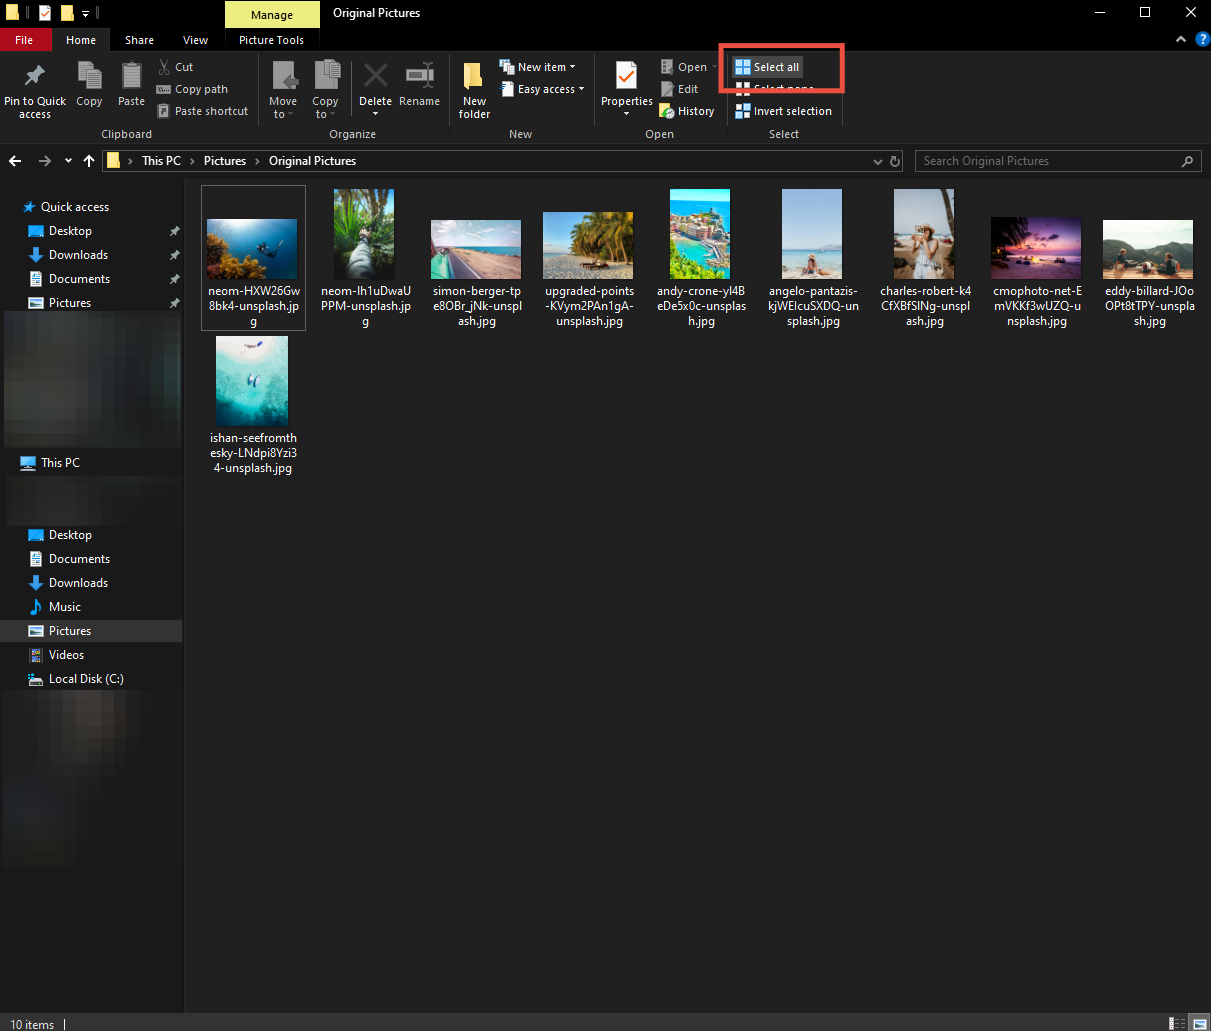
Before moving the files you must select the files you want to move. You can either do this one by one and move each individual file, a time consuming method to be sure, or you can click the “select all button”, finally you can click and drag a selection over the files you would like to select.
To select all the images, go to the left hand explorer window. Identify the “Select all” button within the window ribbon. It’s the final section in this top bar as indicated in the image below.
Shortcut Command: Press Ctrl + A to select everthing with an active window.
Another option for selecting files. Which can be helpful if you are not selecting all of your files is the “Drag Selection”.
You can make this selection by clicking in an area that has no files and, while holding the button down, drag over the files. You will see the files become “selected” by a change in the file background, a square surrounding the file. You will also see a “selection indicator” in the form of a blue rectangle that follows your mouses movement.
Now that we have our files selected, lets get them moved! Again we have two options for how we can do that. the “Drag and Drop” or the “Cut and Paste” Use either and find what is most comfortable to you.
Drag and Drop
Now that you have your images selected. The drag and drop method is as easy as clicking with your mouse on any selected item and holding the mouse button down. That’s the trickiest part, you must remember to not release the mouse button until you have finished the “drag” operation.
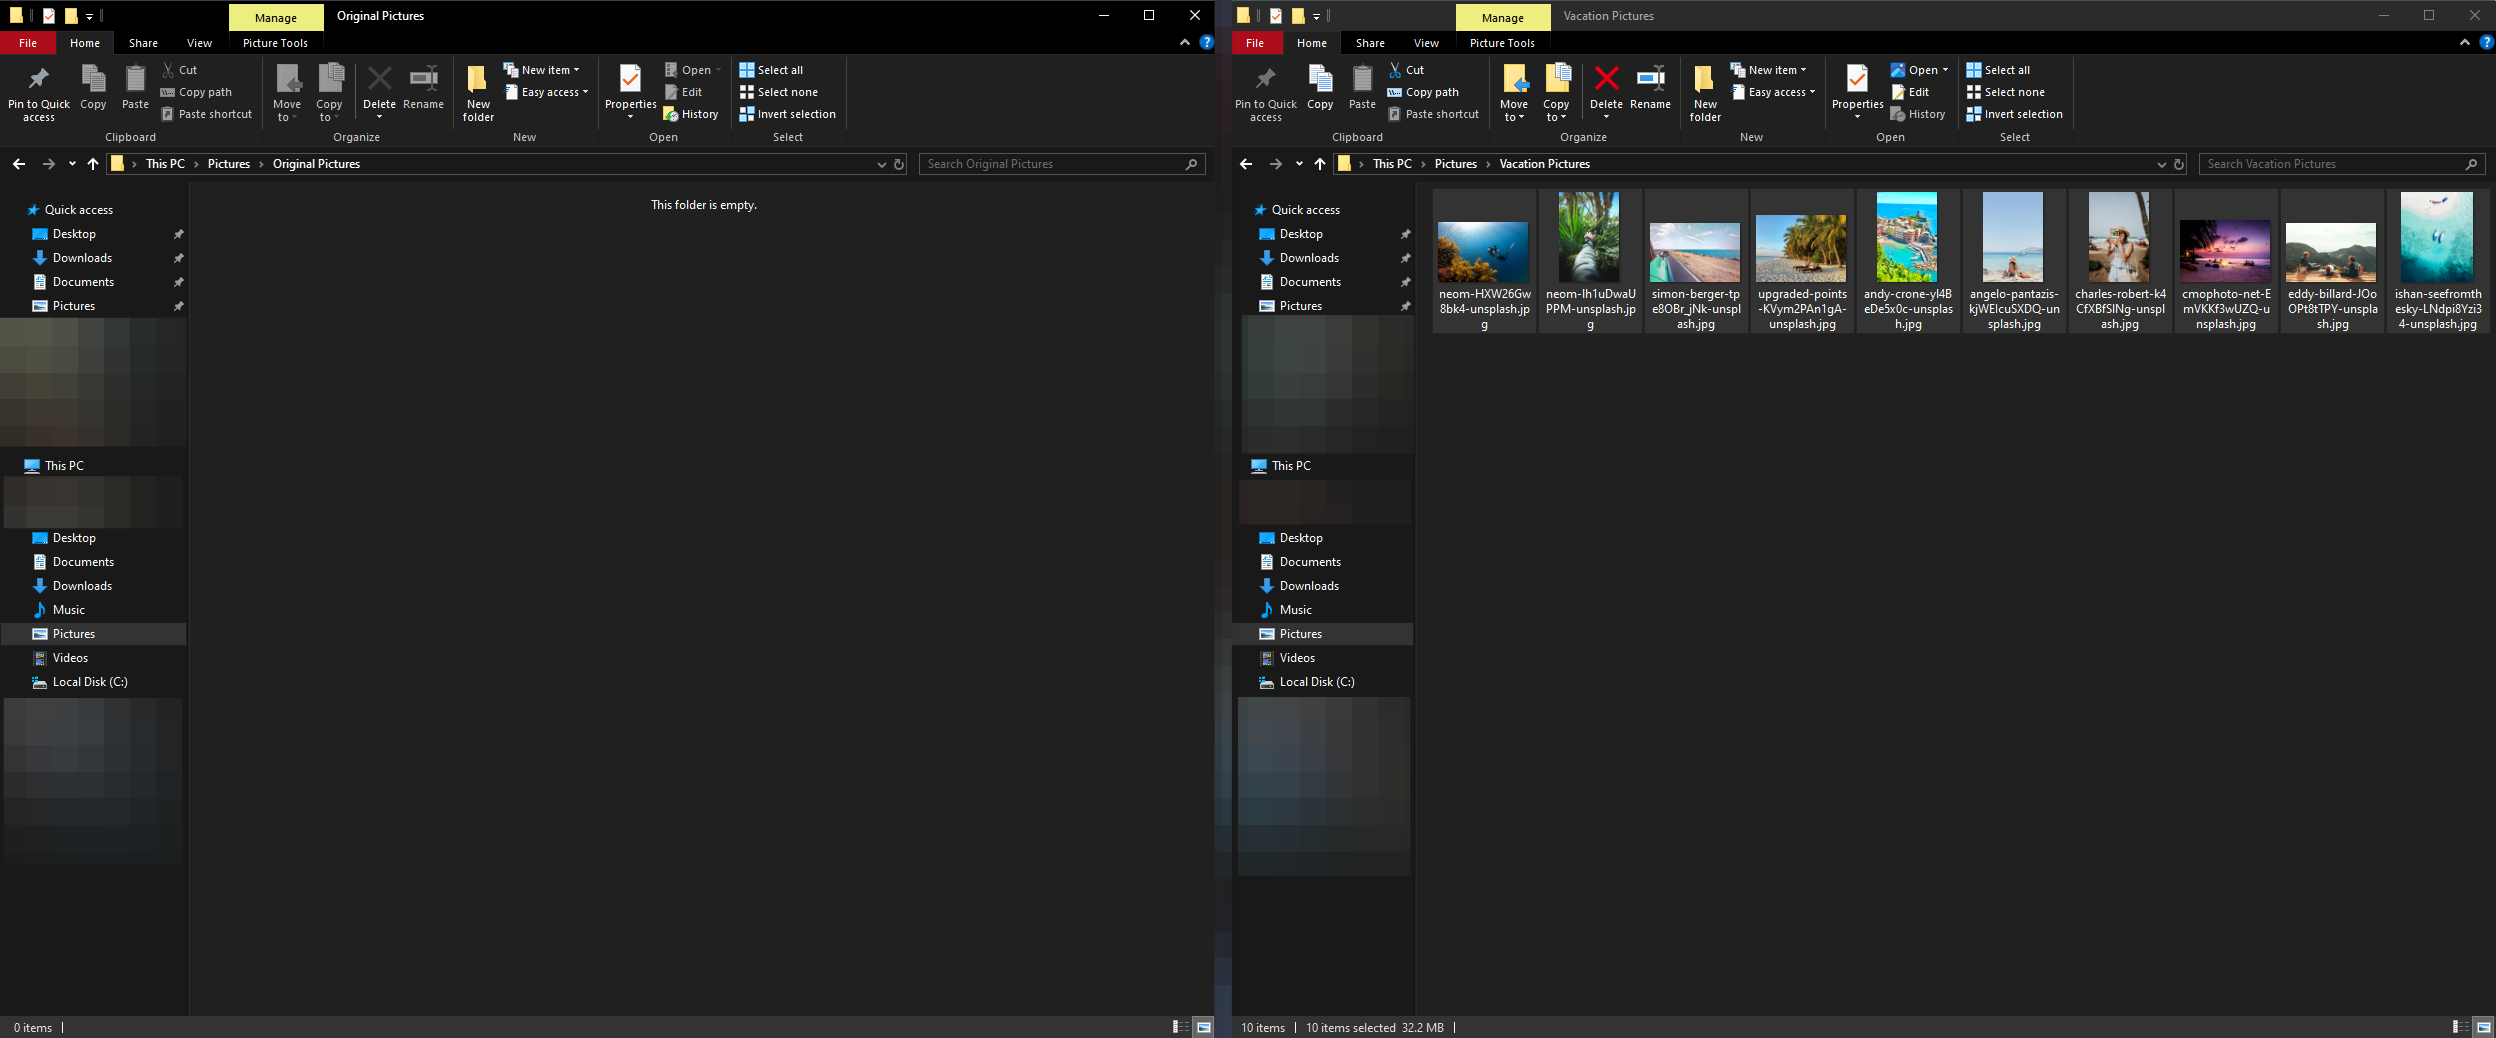
Once you have clicked on the file, move your mouse and you will see the files bundle together with a number indicating how many files you are moving. Continue to move the mouse from the left file explorer to the right side. Once you have hovered over the right side you will see an indicator saying exactly what you are intending to do “Move to Vacation Pictures”. At this point, release the mouse button. You will see the files disappear from the left explorer and appear in the right.
You have now successfully moved your files! Feel free to drag and drop them back and forth until you get a feel for moving the files around on your computer.
Cut and Paste
The cut and paste method is fairly straight forward though it does invilve a few more steps. The first step after you have selected all of the files on the left hand explorer is to identify the “cut” button. In the explorer “ribbon” at the top of the window you will see many tools. In the first section you will see a small icon with scissors that says cut. Click on this icon.
Shortcut Command: You can press Ctrl + X on the keyboard
Once you have clicked on the “cut” button or used the shortcut you can then go to the right hand explorer, our destination. And click on the larger “Paste” button. This will finalize the move of the files. You have now succeffuly Cut and Pasted your files to a new location.
Shortcut Command: You can press Ctrl + V to paste the files
Troubleshooting Tip: If the paste button is not active, then you do not have any files in the clipboard so please try to “cut” the files again and be sure that all of the files you want to cut are selected.
Conclusion
Now that’s it, you should now see the files you wanted to move in the right hand explorer window. If you selected all of the files the left hand window will now be completely empty. You can safely delete this folder or re purpose it to store other files. Now that you know how to safely move files from one location to another, you will be able to organize your files in a way that makes sense to you, but creating new folders and moving the correct files into their ideal location.


